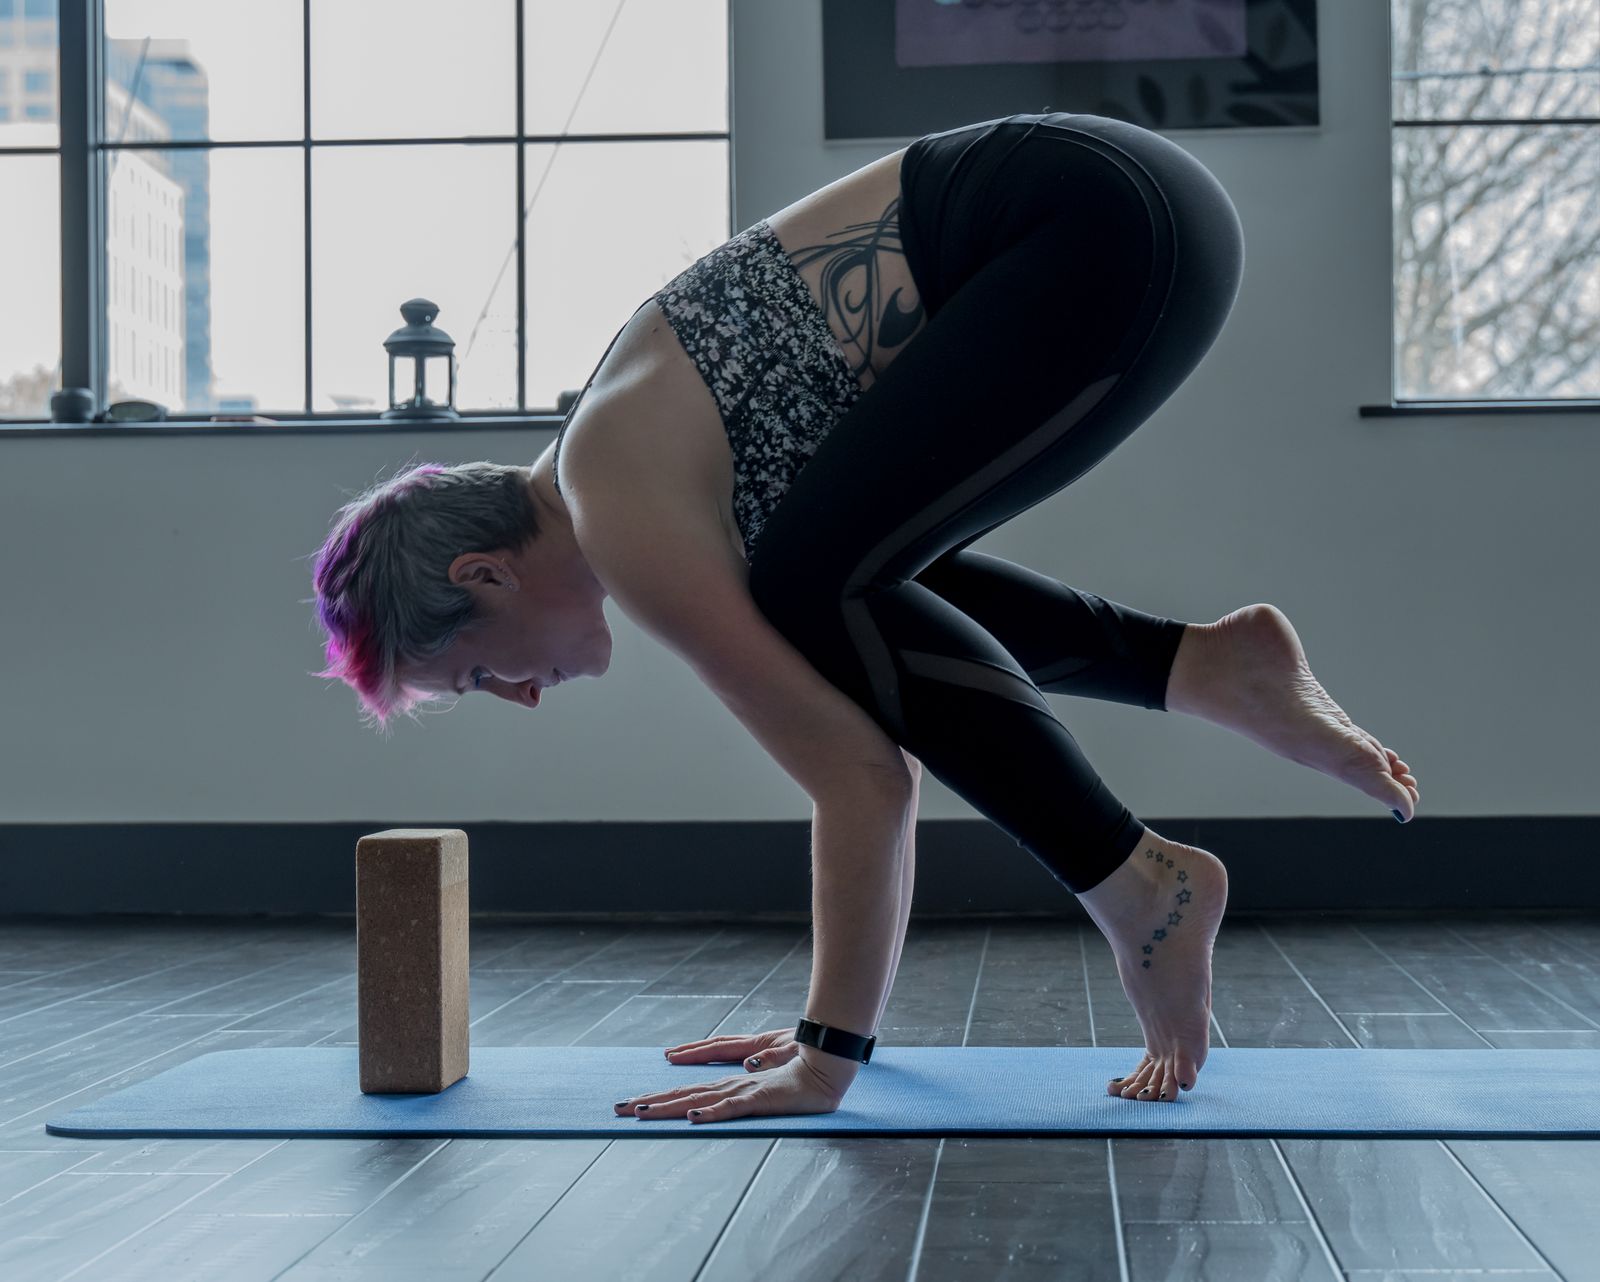
Bakasana, widely known as crow pose, is an arm-balancing yoga posture in which you balance your entire body weight on your hands while your knees rest against or hover above your upper arms, with your feet lifted off the floor. It builds core strength, wrist and arm stability, and mental focus, and it typically takes a mix of hip flexibility, forearm strength, and balance practice to hold for even a few seconds. Most practitioners work up to bakasana through preparatory poses over several weeks rather than achieving it on the first try, and that gradual build is exactly what makes it such a satisfying milestone pose for beginners moving from a beginner practice into intermediate work.
What Is Bakasana (Crow Pose)?
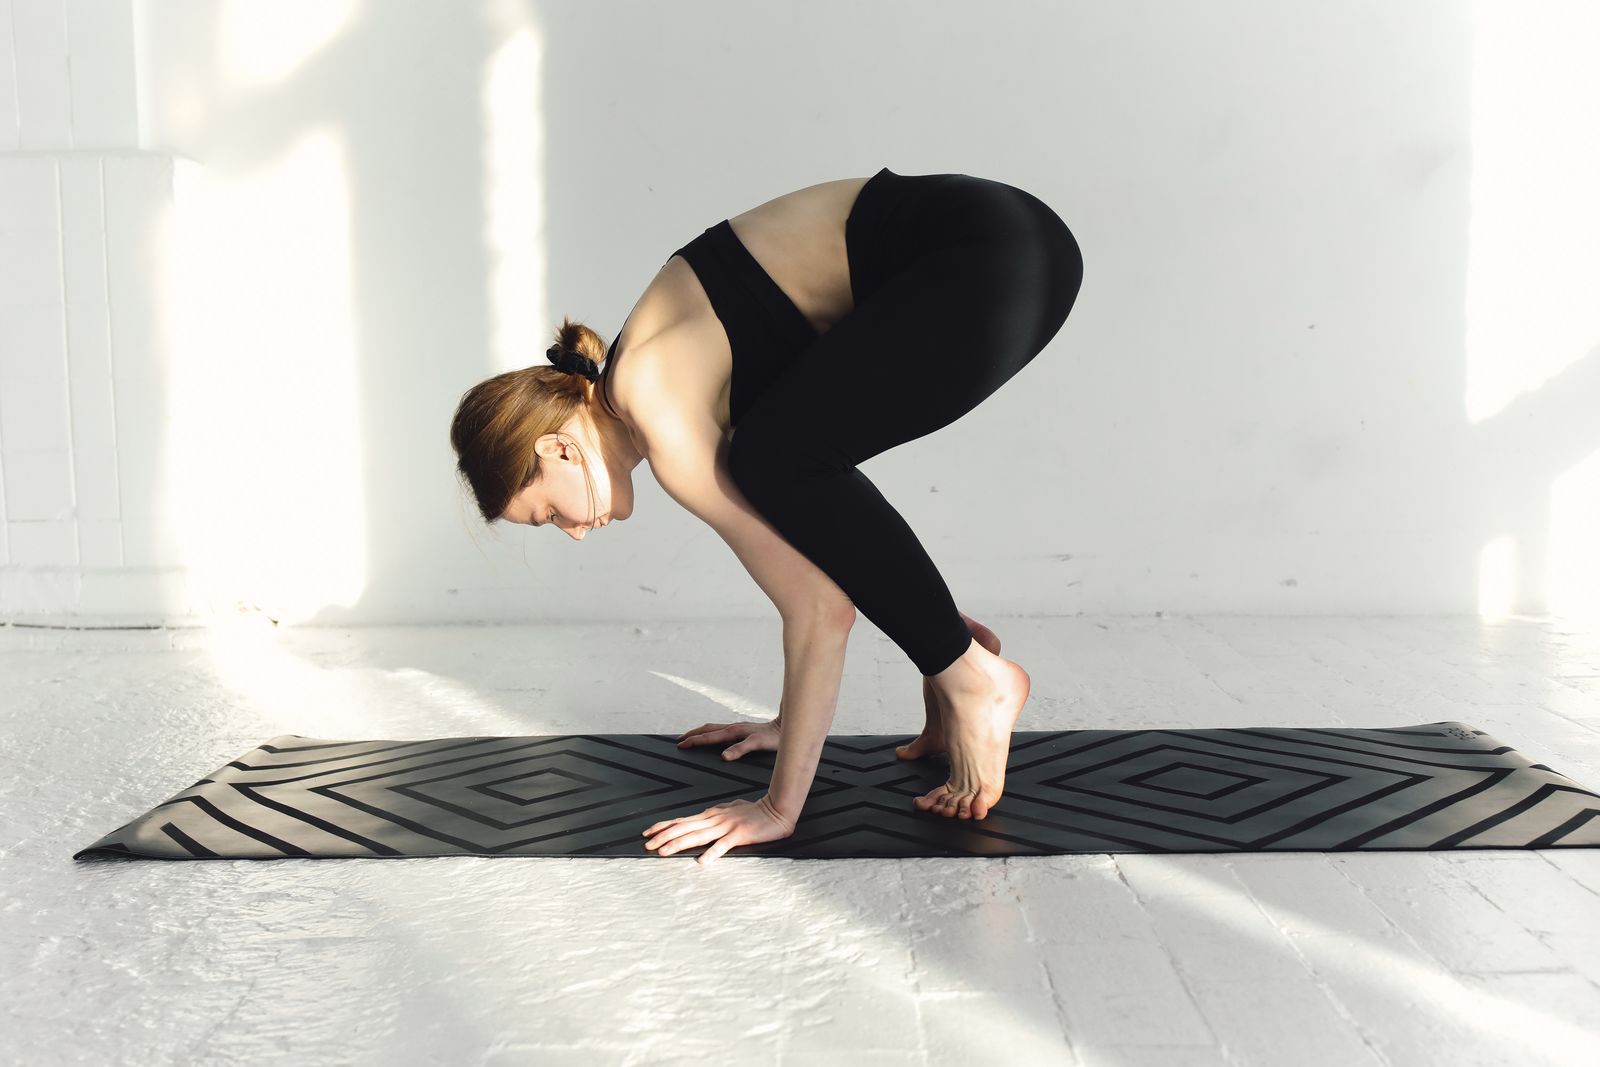
Bakasana comes from the Sanskrit words “baka” (crane) and “asana” (pose), though in most modern studios and online classes it’s taught and marketed as “crow pose.” The posture asks you to squat down, plant your hands shoulder-width apart on the mat, shift your weight forward onto your palms, rest your knees on the backs of your upper arms near the triceps, and lift your feet off the ground. The result looks like a bird perched on a branch, wings tucked, weight balanced entirely on thin support. It’s one of the first arm balances taught in most vinyasa and hatha sequences because it introduces the core mechanics — weight-shifting, gaze focus, and controlled breath — that every deeper arm balance later builds on.
Is It Bakasana or Kakasana? Clearing Up the Name Confusion
You’ll see “bakasana” and “kakasana” used interchangeably online, and the overlap causes real confusion for new students. Traditionally, kakasana (from “kaka,” meaning crow) refers to the version with bent elbows and knees tucked closer to the armpits, while bakasana (crane) is often described as the straighter-armed variation. In practice, most English-language yoga classes — including the vast majority of teacher trainings and studio schedules — use “bakasana” as the catch-all name for the bent-arm crow shape most beginners learn first. This article follows that common convention, since it reflects how the pose is searched for and taught in most yoga spaces today.
How Do You Get Into Crow Pose Step by Step?
Start in a low squat (malasana) with your feet slightly wider than hip-width and your heels lifted if needed. Place your hands flat on the mat, shoulder-width apart, fingers spread wide for a stable base. Bend your elbows slightly — never lock them straight — and lean your body weight forward until your knees rest on the backs of your upper arms, close to your armpits. Round your upper back slightly, draw your lower belly in, and fix your gaze on a point on the floor a few inches in front of your hands. Shift more weight into your hands, lift one foot, then the other, squeezing your inner thighs toward your triceps to stay lifted. Hold for three to five breaths before lowering with control.
Which Poses Should You Master Before Attempting Bakasana?
Preparatory strength and flexibility make the difference between straining and floating. Build toward bakasana with these building blocks:
- Malasana (garland pose) — opens the hips and trains the deep squat that bakasana starts from.
- Plank pose — builds the shoulder, wrist, and core endurance needed to hold body weight on your hands.
- Chaturanga dandasana — teaches the elbow-tracking and core engagement that keeps crow pose stable.
- Downward-facing dog — conditions the wrists and shoulders for repeated weight-bearing.
- Tadasana (mountain pose) — sounds unrelated, but the postural alignment and breath awareness it teaches carries directly into balance work.
Spending two to four weeks on these fundamentals, a few times a week, is a realistic timeline for most beginners before crow pose starts to feel achievable rather than aspirational.
What Muscles Does Crow Pose Strengthen?
Bakasana is a full-body integration pose, but it targets a specific group of muscles hardest. The wrist flexors and forearms absorb the initial load-bearing demand. The triceps, deltoids, and pectoral muscles stabilize the shoulder girdle so your arms don’t buckle. Your core — specifically the transverse abdominis and obliques — does the real work of keeping your hips lifted and your spine from collapsing. Your inner thighs and hip flexors engage to hug your knees toward your arms. Because so many muscle groups fire simultaneously, regular practice of crow pose is often cited by yoga teachers as an efficient way to build functional upper-body and core strength without any equipment.
What Are the Benefits of Practicing Bakasana Regularly?
Beyond the obvious strength-building, bakasana offers benefits that extend into balance, focus, and confidence. It sharpens proprioception — your body’s sense of where it is in space — which carries over into everyday coordination and injury prevention. It builds wrist resilience, which is valuable for anyone who spends hours typing or using a phone. The intense concentration the pose demands is a practical exercise in mindfulness: you cannot think about your grocery list while balancing on your hands. Many students also describe a genuine confidence boost the first time they hold the pose, since it’s often the first “impressive-looking” posture a beginner achieves — a mental win that feeds into the broader benefits of yoga like stress reduction and improved body awareness. Pairing arm balance practice with a broader routine, such as surya namaskar (sun salutations), helps build the shoulder stamina and warm-up needed to attempt bakasana safely.
What Are Common Mistakes Beginners Make in Crow Pose?
The most frequent error is looking straight ahead instead of down at the floor — this shifts your center of gravity backward and makes tipping over far more likely. Another common mistake is placing the knees too low on the arms, near the elbows, instead of higher up near the armpits, which reduces stability. Many beginners also keep their arms fully straight and locked, which removes the “shelf” the knees need to rest on; a slight bend in the elbows creates a more stable platform. Rushing the weight shift — trying to jump both feet up at once — often causes a fall. Lifting one foot at a time, and pausing to find balance before lifting the second, builds far more control. If wrist discomfort is holding you back, our guide on yoga for wrist pain covers gentler conditioning work you can do alongside your crow pose practice.
How Do You Avoid Falling on Your Face in Crow Pose?
Falling forward is the single biggest fear that keeps beginners from committing to the pose, so it helps to practice with a plan. Place a folded blanket or a bolster a few inches in front of your hands so that if you do tip forward, you have a soft landing and can simply roll onto your shoulder rather than catching yourself with your face or wrist. Practicing near a wall, with the wall a foot or so behind you, can also build confidence since it limits how far backward you can tip. Most experienced teachers will tell you that everyone falls out of crow pose while learning it — treating the fall as part of the process, not a failure, removes much of the fear that causes tension and rigidity in the shoulders. This same mindset shift is central to yoga for beginners more generally: progress in balance poses comes from repeated, low-stakes attempts rather than a single perfect try.
What Are Good Modifications for Beginners Who Can’t Lift Off Yet?
If lifting both feet feels out of reach, there are several accessible entry points. Try crow pose with your head resting lightly on a block or the floor in front of your hands (sometimes called “tripod crow prep”) to remove some of the balance demand while you build arm strength. Practice lifting just one foot at a time while keeping the other toes on the ground for support. Using a yoga block under your feet in the starting squat can also reduce how far you need to shift your weight forward. These modifications aren’t lesser versions of the pose — they’re valid stepping stones that build the same muscles and patterns you need for the full expression, much like how modified variations are encouraged across our broader yoga for flexibility guidance.
What Variations Exist Once You’ve Mastered Basic Crow Pose?
Once bakasana feels stable, several variations extend the challenge. Side crow (parsva bakasana) twists the torso so both knees stack on one upper arm, demanding more oblique strength and rotational control. Flying crow (eka pada bakasana) extends one leg straight back while balancing on the other knee, building significant hip and shoulder strength. Straight-arm crow, closer to the traditional bakasana/crane distinction, removes the bent-elbow shelf entirely and relies purely on shoulder and core strength. Advanced practitioners sometimes transition from crow directly into a headstand (sirsasana) or a jump-back to chaturanga, linking the pose into a flowing vinyasa sequence rather than treating it as a static hold.
Is Bakasana Safe for Beginners, and Who Should Avoid It?
Bakasana is generally safe for healthy beginners who build up through the preparatory poses and progress gradually, but it isn’t the right pose for everyone on every day. If you have a wrist injury, carpal tunnel syndrome, or a recent shoulder injury, it’s worth skipping crow pose or working with a qualified teacher on modifications first. Pregnant practitioners are typically advised to avoid deep arm balances that compress the abdomen. Beginners with very tight hips may find the deep squat entry uncomfortable before their hip flexibility improves — in that case, spending more time on hip-opening poses first is a better use of practice time than forcing the balance. As with any new pose, easing in with the guidance of a qualified yoga instructor reduces the risk of strain considerably.
How Long Does It Take to Learn Crow Pose?
There’s no fixed timeline, since it depends heavily on existing core and wrist strength, but many beginners who practice consistently — two to three times a week — report their first successful lift within three to six weeks. Flexibility in the hips and hamstrings speeds up the deep squat entry, while existing plank or push-up strength speeds up the arm-balancing component. Patience matters more than intensity here: attempting crow pose daily without adequate rest for your wrists and shoulders can lead to overuse strain rather than faster progress. A steady, well-paced routine that includes complementary standing poses like vrksasana (tree pose) to build single-point balance, along with general yoga for balance work, tends to produce more durable results than rushing straight to the arm balance.
How Does Bakasana Fit Into a Broader Yoga Practice?
Crow pose rarely stands alone in a well-rounded practice. It’s typically sequenced after a warm-up of sun salutations and standing poses, when the wrists and shoulders are already primed, and before deeper backbends or seated stretches that let the arms recover. In a vinyasa class, bakasana often serves as a peak pose — the challenging centerpiece the whole sequence has been building toward. If you’re following a structured plan, it pairs naturally with a broader look at the different types of yoga styles, since arm balances show up more frequently in power and vinyasa-style classes than in gentler restorative or yin sessions.
Questions People Ask About Bakasana
Is bakasana hard for beginners?
Yes, bakasana is considered a beginner-to-intermediate pose that usually requires some dedicated practice rather than being achievable on the first attempt. Most people need several weeks of building core, wrist, and forearm strength through preparatory poses before they can hold it. It looks more intimidating than it is once you understand the weight-shifting technique and commit to the forward lean.
What does bakasana mean in Sanskrit?
Bakasana combines “baka,” meaning crane, with “asana,” meaning pose or seat. Despite the literal translation referencing a crane, the pose is almost universally taught and searched for in English as “crow pose.” Some traditions distinguish it from kakasana (true crow pose), but the two names are used interchangeably in most modern yoga classes.
Do you need strong wrists for crow pose?
Reasonably strong, mobile wrists help significantly, since they bear your full body weight during the hold. If your wrists feel strained, spreading your fingers wide, pressing firmly through your knuckles, and building up wrist strength gradually with poses like downward-facing dog and plank will make bakasana far more comfortable over time.
Why do I keep falling forward in crow pose?
Falling forward usually means your gaze has drifted upward or forward instead of staying down at the floor, which shifts your center of gravity too far ahead of your hands. It can also mean your knees are resting too low on your arms. Refocusing your gaze downward and repositioning your knees closer to your armpits usually resolves it.
Can crow pose help with weight loss or toning?
Crow pose engages the core, arms, shoulders, and inner thighs intensely, so regular practice contributes to muscle toning and functional strength as part of a broader fitness routine. It isn’t a standalone weight-loss tool, but combined with a consistent yoga or fitness practice and a balanced diet, arm balances like bakasana add a useful strength-training component.
Try This for Yourself
Reading about bakasana only gets you so far — the weight-shifting, breath control, and balance it demands are things you feel out in real time with guidance. If you’d like structured, live support while you build toward your first crow pose, FitStrot’s online yoga classes pair you with instructors who can adjust your alignment, pace your progression safely, and help you troubleshoot exactly why you’re tipping forward or struggling to lift off.
Related reading: explore our full library of yoga poses and asanas, learn the foundational surya namaskar sequence, ground your alignment with tadasana, build balance with vrksasana, or join a live class through FitStrot’s online yoga classes.