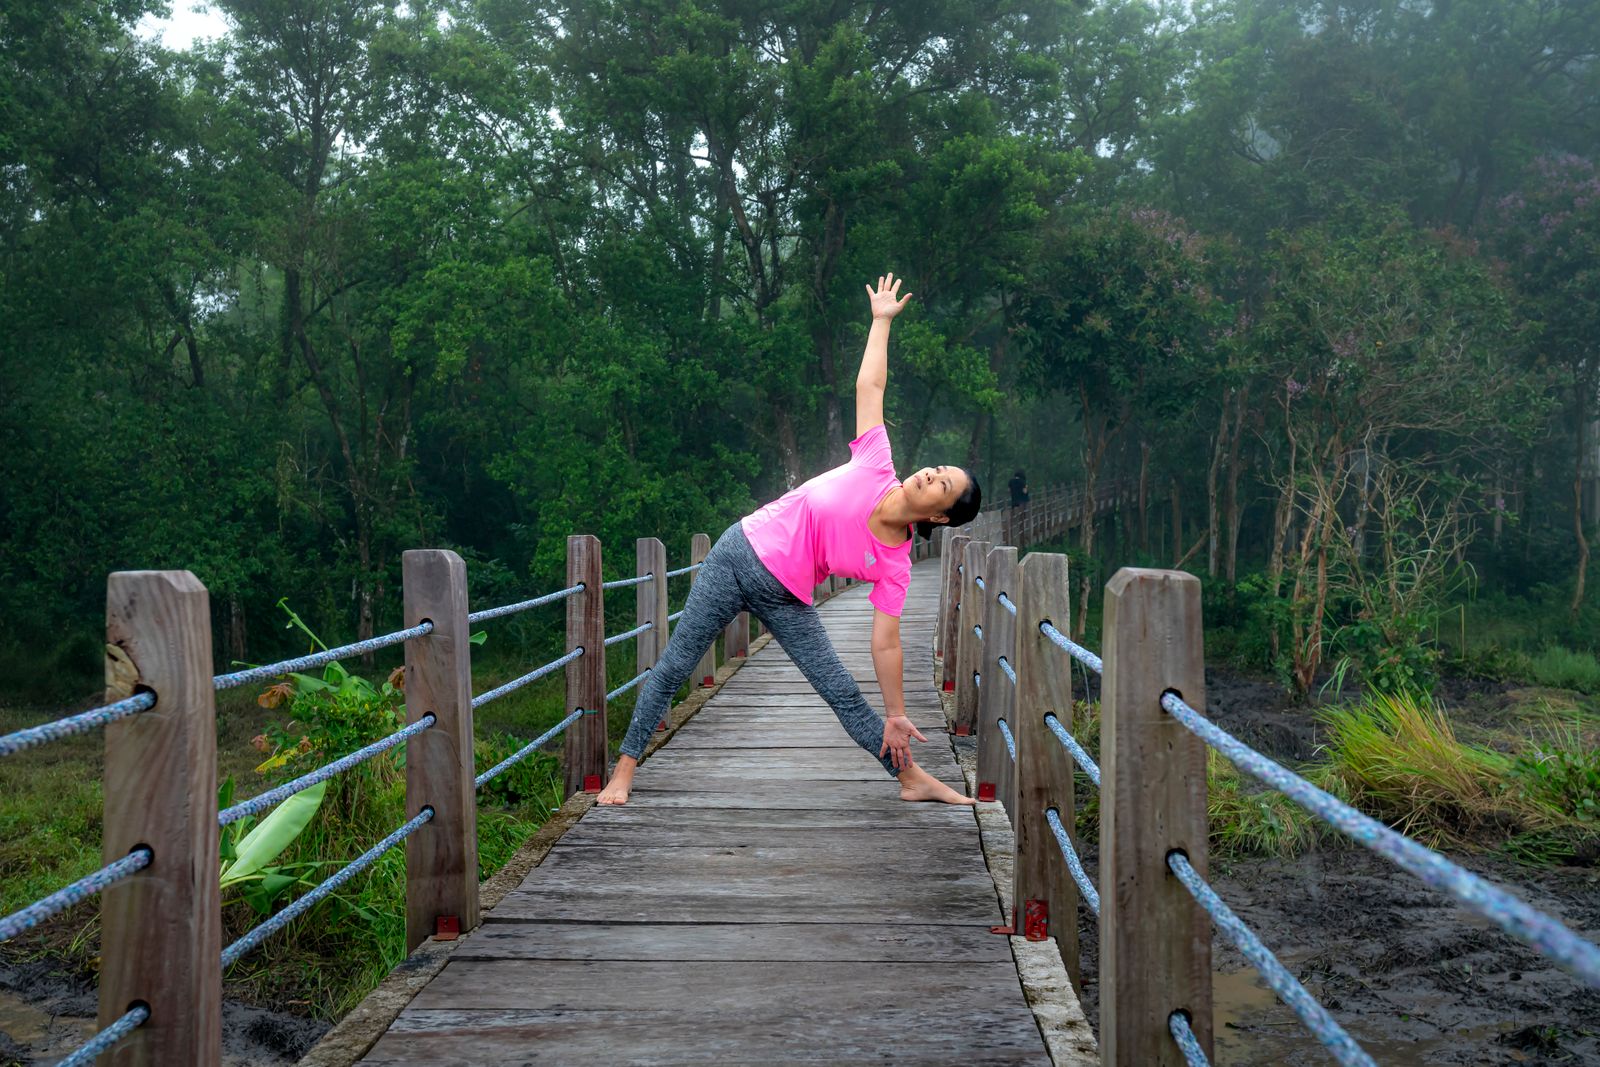
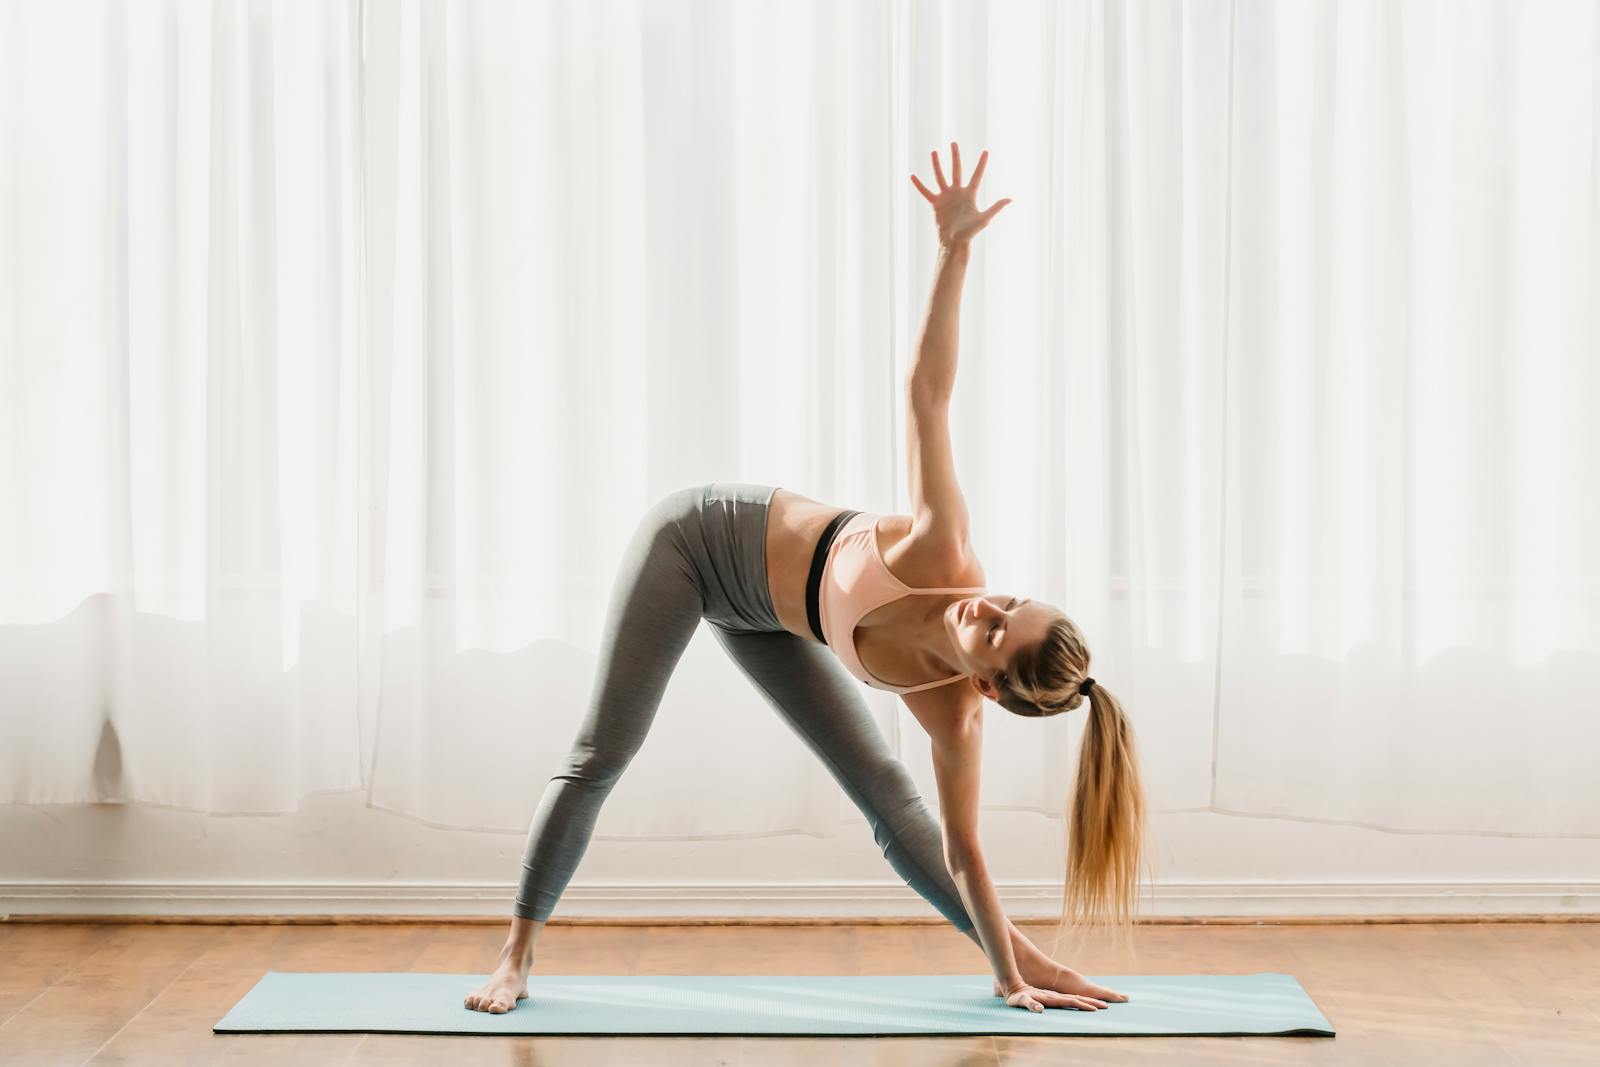
Trikonasana, or Triangle Pose, is a standing yoga posture where you step your feet wide apart, extend your arms parallel to the floor, then hinge sideways from the hip to bring one hand toward your shin, ankle, or the floor while the other arm reaches straight up. The name comes from the Sanskrit words utthita (extended), trikona (triangle), and asana (posture) — a reference to the triangular shape formed by your legs and extended arm. It stretches the hamstrings, groin, and side body while strengthening the legs, ankles, and core, and it’s one of the first standing poses taught in most yoga styles because it builds the alignment habits that harder poses later depend on.
What Is Trikonasana in Yoga?
Trikonasana is a wide-legged standing stretch that trains lateral flexion — bending sideways rather than forward or backward. Unlike a forward fold, the torso stays in one plane, rotated open toward the front of the room rather than collapsing down. This makes it a foundational pose for understanding hip hinging, spinal length, and shoulder stacking, three alignment principles that carry over into dozens of other postures, including extended side angle pose and half moon pose.
Most teachers introduce it early in a standing sequence, often right after tadasana (mountain pose) and before deeper hip openers. It’s classified as a beginner-level asana, but the alignment details — where the hips face, how much the knee bends, where the bottom hand lands — take years to fully refine, which is part of why experienced practitioners still return to it in every practice.
How Do You Do Trikonasana Step by Step?
Here is a step-by-step breakdown for a safe, well-aligned Triangle Pose:
- Start in Tadasana at the top of your mat, then step your feet 3.5 to 4 feet apart, roughly one leg-length, depending on your height.
- Turn your right foot out 90 degrees so the toes point to the top of the mat, and turn your left foot in slightly, about 15 to 30 degrees.
- Align your front heel with the arch or heel of your back foot, and make sure your hips face forward, not toward the side.
- Raise your arms to shoulder height, parallel to the floor, palms facing down.
- Hinge from your right hip, keeping your torso long, and reach your right hand down toward your shin, ankle, or a yoga block placed outside your right foot.
- Extend your left arm straight up toward the ceiling, stacking your shoulders vertically so your chest opens toward the side, not the floor.
- Keep your front knee soft, not locked, and press firmly through both feet to keep the pose active rather than collapsed.
- Turn your gaze up toward your top hand if your neck is comfortable, or keep it forward or down.
- Hold for 30 seconds to one minute, breathing steadily, then rise back up on an inhale and repeat on the other side.
Practicing near a wall for your back heel, or using a yoga block under your bottom hand, makes it far easier to keep the alignment described above rather than sacrificing form to reach the floor.
What Are the Benefits of Trikonasana?
Trikonasana works several muscle groups and systems at once, which is part of why it’s included in nearly every standing yoga sequence, from a beginner’s first class to advanced Surya Namaskar-based flows.
- Stretches the hamstrings, groin, and hips — the wide stance and lateral hinge lengthen the back leg’s hamstring and the front leg’s inner thigh simultaneously.
- Opens the chest and shoulders — stacking the arms vertically stretches the pectorals and the muscles along the ribcage on the reaching side.
- Strengthens the legs and ankles — holding the wide stance builds quadriceps, calf, and ankle stability over time.
- Improves spinal mobility — the lateral bend works the spine in a plane most daily movement and many other asanas neglect.
- Trains core and oblique engagement — keeping the torso from collapsing forward or back requires active bracing through the entire midline.
- Builds body awareness — because the alignment cues are precise, Trikonasana is often used to teach students how small foot, hip, and shoulder adjustments change how a pose feels.
Practitioners commonly report that consistent practice improves posture and reduces stiffness from long hours of sitting, though results vary by body and practice frequency, and Trikonasana works best as part of a broader routine rather than a standalone fix. For a deeper look at how standing poses support everyday posture, see our guide on yoga for back pain.
Which Muscles Does Trikonasana Stretch and Strengthen?
Trikonasana engages a wide muscular map. The hamstrings and adductors of both legs lengthen under the wide stance, while the quadriceps of the front leg work isometrically to keep the knee stable and soft. Through the torso, the obliques on the reaching side stretch as the ribs open, while the opposite side’s obliques contract to support the lateral bend. The deltoids and muscles around the shoulder blades work to keep both arms in one straight line, and the muscles of the feet and ankles activate to hold the wide, weight-bearing stance steady. Because it recruits the legs, spine, shoulders, and core together, some yoga anatomy teachers describe it as a near-total-body posture packed into a single static hold.
What Are Common Trikonasana Alignment Mistakes?
Most Trikonasana discomfort or ineffectiveness traces back to a handful of repeated alignment errors:
- Collapsing the torso forward instead of hinging sideways, which turns the pose into a twisted forward fold and loses the lateral stretch.
- Overreaching for the floor, which rounds the spine and shortens the very side you’re trying to lengthen. Using a block under the hand fixes this instantly.
- Letting the front knee hyperextend by locking it fully, which places unnecessary strain on the joint. A microbend keeps the knee protected.
- Rotating the hips instead of the ribcage, so the pelvis faces the side wall rather than staying square to the front of the mat.
- Dropping the top shoulder forward, closing off the chest opening that the pose is designed to create.
Working slowly through these details with a mirror, a teacher, or an online yoga class where an instructor can watch your form in real time makes correcting them far easier than adjusting alone.
Who Should Avoid or Modify Trikonasana?
Trikonasana is broadly beginner-friendly, but certain conditions call for caution or modification. People with low blood pressure, migraines, or diarrhea are often advised to keep the head level rather than turning the gaze upward. Those with neck injuries should keep the head facing forward instead of looking up at the top hand. Anyone with a recent hip, knee, or lower back injury should approach the deep hinge and wide stance carefully, ideally with a shortened stance and support from a wall or block. Pregnant practitioners are often taught a modified, wider-stance version with the back supported against a wall, and should always check with a qualified prenatal yoga instructor before practicing standing poses in later trimesters. As with any asana, listen to your body and stop if you feel sharp pain rather than a stretch.
How Does Trikonasana Compare to Parsvakonasana?
Trikonasana and Parsvakonasana (Extended Side Angle Pose) share the same wide stance and lateral orientation, but the knee position and depth differ. In Trikonasana, the front leg stays straight, and the pose is a lateral hinge with a long, active line from foot to fingertips. In Parsvakonasana, the front knee bends to a right angle, and the reaching hand or forearm often lands on the thigh or the floor, creating a deeper stretch through the hip and side body. Many teachers sequence Trikonasana first because its straight-leg stance is a gentler introduction to the hip and shoulder alignment that Parsvakonasana later intensifies.
What Variations of Trikonasana Exist?
Beyond the classic Utthita Trikonasana (Extended Triangle Pose), several variations adjust the intensity or target different muscle groups:
- Parivrtta Trikonasana (Revolved Triangle Pose) adds a spinal twist, bringing the opposite hand to the front foot instead of the same-side hand, which challenges balance and hamstring flexibility further.
- Supported Trikonasana uses a block under the bottom hand, ideal for beginners or anyone with tight hamstrings.
- Wall-supported Trikonasana uses a wall behind the back heel and hips for extra stability, useful for pregnant practitioners or those working on balance.
- Trikonasana with a chair replaces the floor reach with a chair seat, making the pose accessible for people with limited mobility or significant hamstring tightness.
Trying these variations is a natural next step once the foundational alignment of the classic pose feels stable, and it pairs well with balance-building poses like Vrksasana (Tree Pose) in a well-rounded standing sequence.
When Should Trikonasana Be Practiced in a Yoga Sequence?
Trikonasana is typically placed in the standing pose section of a practice, after the body has warmed up through a few rounds of Surya Namaskar or simple stretches, and before deeper backbends or seated poses. Practicing it cold, without any warmup, increases the risk of straining the hamstrings or lower back. A common sequence might move from Tadasana into a few Surya Namaskar rounds, then into Trikonasana, followed by Parsvakonasana and Virabhadrasana II (Warrior II), before transitioning to balance poses or a seated cool-down. This placement lets the pose do its job of opening the hips and side body while the muscles are already pliable.
How Long Should You Hold Trikonasana?
For most practitioners, holding Trikonasana for 30 seconds to one minute per side, repeated for two to three rounds, is enough to gain the flexibility and strength benefits without overtaxing the muscles. Beginners often start with shorter holds of 15 to 20 seconds while learning the alignment, gradually extending the hold as the hips and hamstrings open up. In restorative or yin-influenced classes, a supported version of the pose may be held for two to three minutes with props, though this is a notably different practice than the active, muscularly engaged version taught in Hatha or Vinyasa yoga.
What Breathing Pattern Works Best for Trikonasana?
Smooth, even ujjayi-style breathing, in through the nose and out through the nose with a slight throat constriction, helps maintain the steadiness Trikonasana requires. Practitioners typically inhale while raising the arms to shoulder height, exhale while hinging into the pose, then take five to eight slow breaths while holding, using each inhale to lengthen the spine slightly and each exhale to deepen the stretch without forcing it. Holding the breath or breathing shallowly tends to increase tension in the shoulders and neck, which works against the openness the pose is meant to create. This breath-movement pairing is a core principle across most pranayama and breath-linked yoga practices.
How Does Trikonasana Fit Into a Broader Yoga Practice?
Trikonasana rarely stands alone. It’s one building block among the many yoga poses that make up a balanced practice, and its lateral-bending mechanics complement forward folds, backbends, and twists that move the spine in other directions. Practitioners following a structured weekly routine often pair standing poses like Trikonasana with hip openers, core work, and a seated meditation or general yoga benefits focus on stress reduction to round out a session. Because it requires no equipment beyond a mat and works virtually every major muscle group, it’s a pose that translates well to home practice, studio classes, and guided online sessions alike.
Questions People Ask About Trikonasana
Is Trikonasana good for beginners?
Yes, Trikonasana is considered a beginner-friendly standing pose and is taught in most introductory yoga classes. Its main challenge is alignment rather than flexibility or strength, so beginners benefit from using a block under the bottom hand and focusing on keeping the torso in one plane rather than straining to touch the floor.
What does Trikonasana mean in Sanskrit?
Trikonasana combines “utthita” (extended), “trikona” (triangle), and “asana” (posture or seat), together meaning “extended triangle pose.” The name refers to the triangular shape created by the legs and extended arm when the pose is held correctly.
Can Trikonasana help with back pain?
Trikonasana can support back health by stretching the hamstrings and strengthening the core and spinal muscles, which are often linked to lower back discomfort from poor posture. However, anyone with an existing back injury should approach the pose cautiously, use modifications like a shorter stance, and consult a qualified instructor or doctor first.
How is Trikonasana different from Parivrtta Trikonasana?
Trikonasana is a lateral bend where the same-side hand reaches toward the same-side foot, keeping the torso open to the side. Parivrtta Trikonasana adds a twist, bringing the opposite hand toward the front foot, which requires more hamstring flexibility, balance, and core control than the classic version.
What is a good Trikonasana pose image or reference to check my form?
Looking at trikonasana yoga images from certified instructors or yoga alignment guides can help you check that your hips are square, your arms are stacked vertically, and your torso stays in one plane rather than rotating forward. Comparing your reflection or a photo of your own practice against these references is one of the fastest ways to self-correct common alignment mistakes.
Do you need props for Trikonasana?
Props are optional but helpful, not mandatory. A yoga block placed outside the front foot lets beginners or anyone with tight hamstrings keep proper alignment without straining to reach the floor. A wall can also help stabilize the back heel and hips while you learn the pose.
Try This for Yourself
Reading about Trikonasana only goes so far — the alignment cues, breath timing, and small adjustments that make this pose effective are much easier to learn with live feedback. Join an online yoga class with FitStrot and practice Trikonasana alongside a certified instructor who can guide your form in real time, whether you’re a complete beginner or refining a pose you’ve done for years.
Related reading: Explore more foundational postures in our guide to yoga poses, learn the flowing sequence in Surya Namaskar, build your standing foundation with Tadasana, improve balance with Vrksasana, and when you’re ready for live guidance, book an online yoga class.