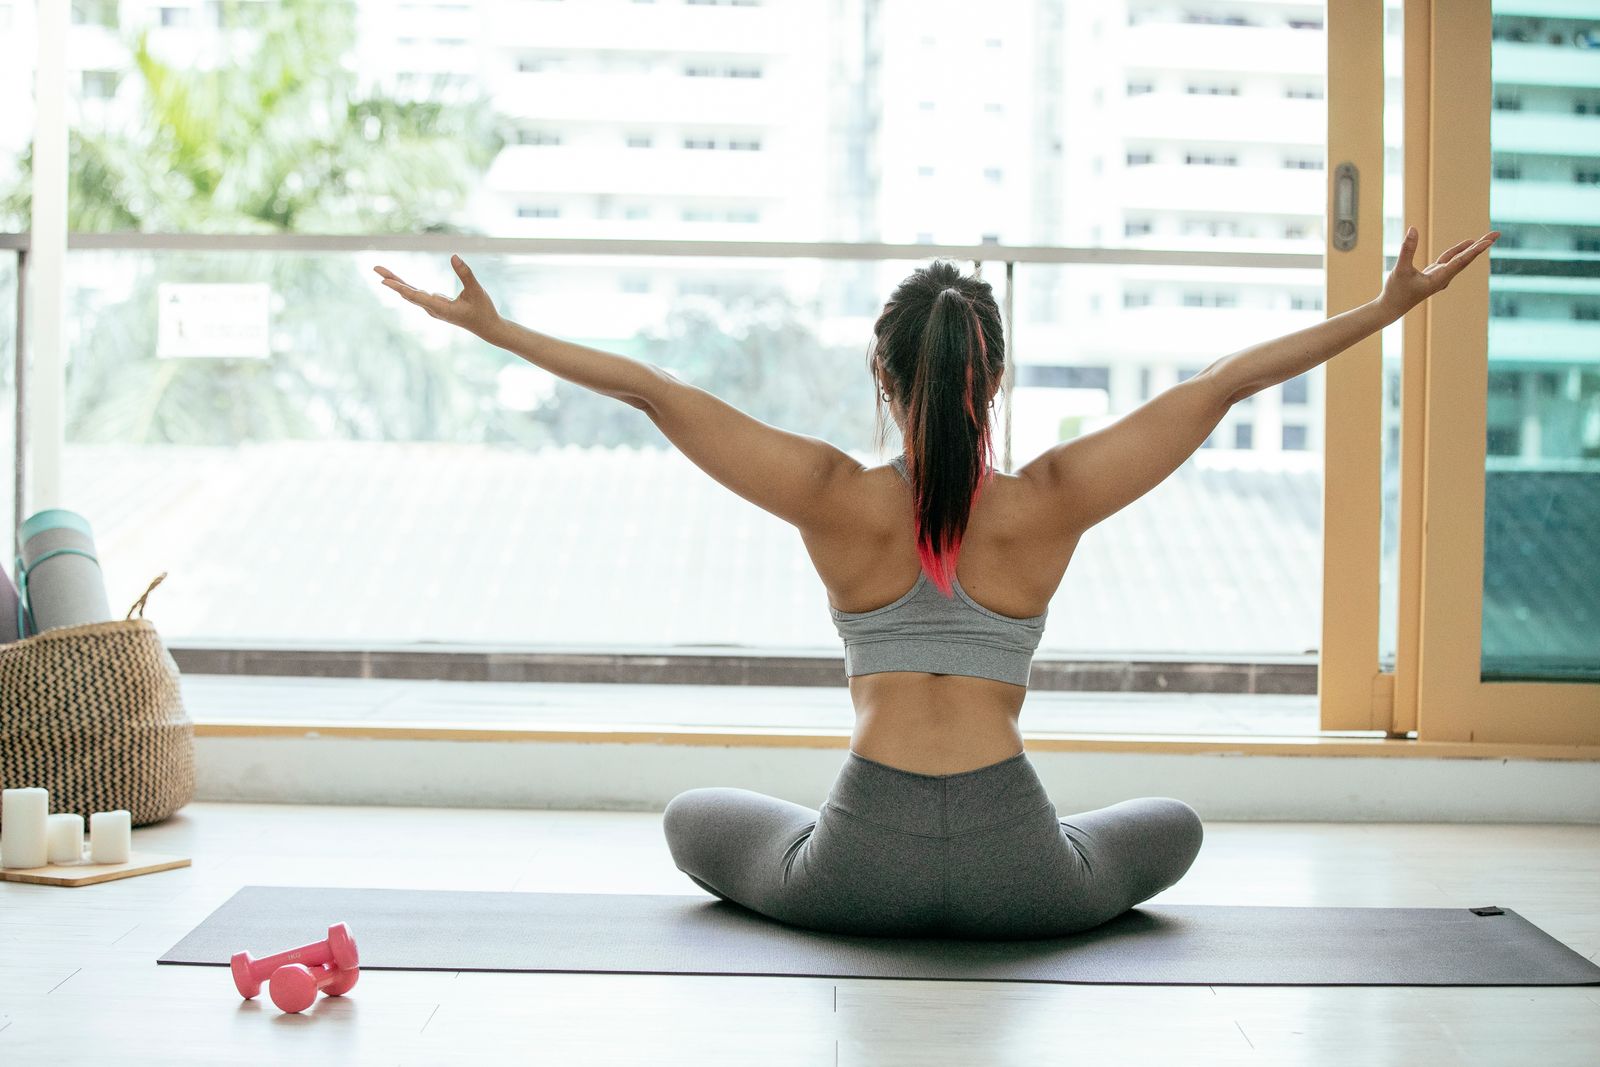
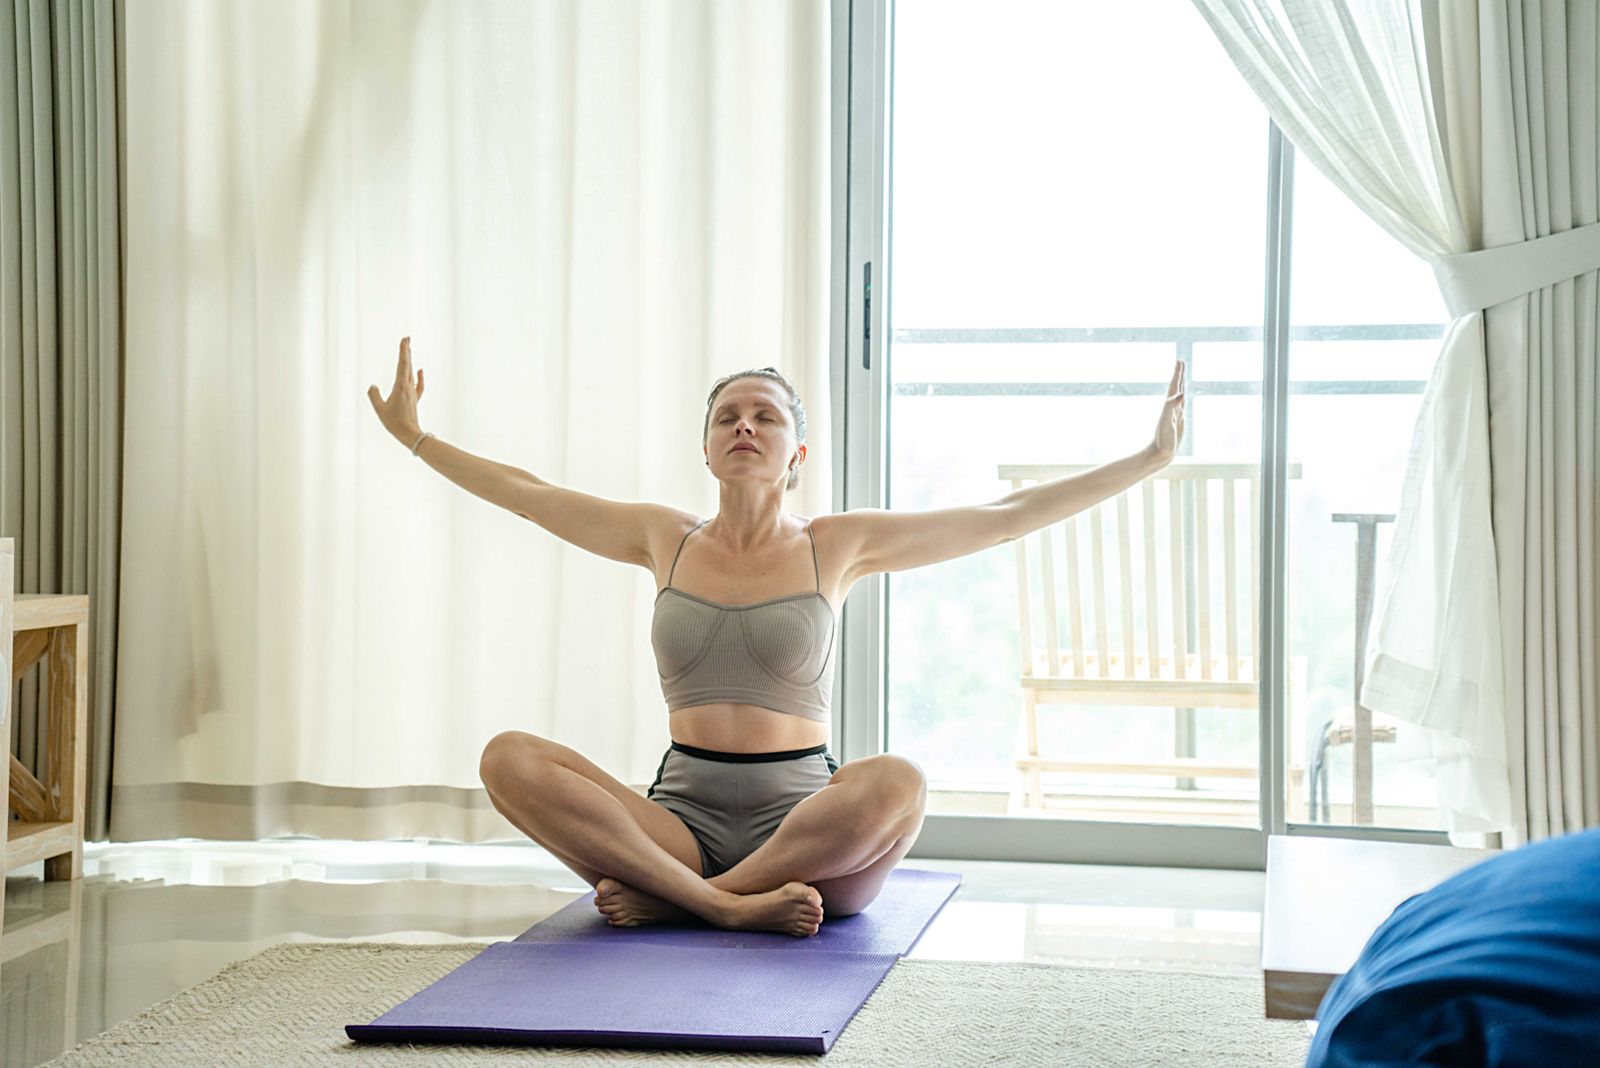
Parvatasana, or Mountain Pose, is a seated yoga posture in which you sit in Padmasana (Lotus Pose) or a comfortable cross-legged position, then raise both arms straight overhead with the palms pressed together, stretching the entire torso upward like the peak of a mountain. It stretches the shoulders, spine, and intercostal muscles, improves posture, and is often used as a warm-up or a calming counterpose after backbends and twists. Most practitioners hold it for 15 to 30 seconds and repeat it for two to four rounds, breathing steadily throughout.
What Does “Parvatasana” Mean?
The name comes from two Sanskrit words: parvata, meaning “mountain,” and asana, meaning “seat” or “posture.” The pose is called Mountain Pose because the raised arms and lifted spine are said to resemble the silhouette of a mountain peak rising from the ground. It’s worth noting that the same English name, “Mountain Pose,” is also commonly used for Tadasana, a standing posture. The two are different shapes entirely, so if you’re following an instructor’s cue and unsure which one is meant, ask whether they mean the seated or the standing version. This article covers the seated, arms-overhead variation traditionally known as Parvatasana.
How Do You Do Parvatasana Step by Step?
Parvatasana is simple in structure but rewards attention to alignment. Follow these steps:
- Sit in Padmasana (Lotus Pose) with your spine tall. If Lotus is uncomfortable for your knees, use Sukhasana (Easy Pose) or Ardha Padmasana (Half Lotus) instead — the arm and spine action is identical.
- Rest your hands on your knees for a moment and lengthen your spine upward from the base to the crown of the head.
- Inhale, and sweep both arms out to the sides and up overhead.
- Bring the palms together above the head, either pressing them flat together or interlacing the fingers with the index fingers extended.
- Keep the elbows straight but not locked, biceps close to the ears, and shoulders drawn down away from the ears.
- Hold the position for 15 to 30 seconds, breathing slowly and evenly through the nose.
- Exhale, release the palms, and lower the arms back to the knees.
- Repeat for two to four rounds, and consider closing your eyes on the final round to notice the stretch through the ribcage and shoulders.
If you’re newer to seated postures in general, it helps to build a foundation with basic yoga poses before adding a deep Lotus-based shape like this one.
What Are the Benefits of Parvatasana?
Parvatasana works on the body in several distinct ways, and understanding each one helps you get more out of the pose rather than just moving through it mechanically.
Shoulder and chest opening. Raising the arms overhead with the palms joined stretches the shoulder joints, the muscles of the upper back, and the sides of the ribcage (the intercostal muscles). This is particularly useful for anyone who spends long hours at a desk or looking down at a phone, where the chest and shoulders tend to round forward.
Spinal elongation. The upward reach encourages the spine to lengthen, which can help counter the compression that builds up from sitting for long periods. Many teachers describe this as a subtle traction effect through the vertebral column.
Improved posture awareness. Because the pose asks you to actively lift through the spine while keeping the shoulders relaxed, it trains the postural muscles that support an upright sitting position, both on and off the mat.
A calming, meditative quality. Held with slow breathing, Parvatasana has a grounding effect similar to seated meditation poses, making it a natural bridge between active practice and stillness.
Hip and knee mobility (via the base position). Since the pose is typically practiced from Lotus or Half Lotus, regular practice also supports the hip-opening work that those base positions require, similar to what you’d build in hip-opening yoga poses.
These benefits are described consistently across yoga teaching resources, though as with most postural claims, they should be understood as reported effects of regular practice rather than guaranteed medical outcomes.
Which Muscles Does Parvatasana Stretch and Strengthen?
Parvatasana primarily stretches the latissimus dorsi, deltoids, and intercostal muscles along the ribs, while gently engaging the muscles of the upper back and core to keep the spine tall. The triceps and shoulder stabilizers work isometrically to hold the arms overhead without collapsing. Because the base is a seated hip position, the hip flexors, glutes, and the muscles around the knees are also indirectly involved in maintaining Padmasana or its variations throughout the hold.
What Are Common Variations of Parvatasana?
Once the basic shape feels steady, a few variations add range of motion and challenge:
- Side bend variation: from the raised-arms position, exhale and bend the torso to one side, keeping the hips grounded, then return to center and repeat on the other side. This adds a lateral stretch through the obliques and ribs.
- Forward bend variation: with arms still overhead and palms joined, hinge forward from the hips while keeping the head between the arms, then return to upright. This deepens the stretch through the shoulders and hamstrings if the legs are extended rather than crossed.
- Backward bend variation: a gentle lean backward from the hips, again keeping the head between the arms, to open the front of the shoulders and chest further. This should be approached cautiously and only after the basic pose is comfortable.
- Easy Pose or Half Lotus base: for anyone whose knees or hips aren’t ready for full Padmasana, practicing the same arm and spine action from Sukhasana or Ardha Padmasana delivers nearly identical benefits without unnecessary knee strain.
These variations pair naturally with a broader seated practice, and many teachers sequence them alongside Vrksasana (Tree Pose) or other balance work to build a full-body session.
How Is Parvatasana Different From Tadasana?
Both poses are sometimes translated as “Mountain Pose,” which causes confusion for newer students. Tadasana is a standing pose: you stand tall with feet grounded, arms typically by your sides or raised, and it functions as the foundational alignment posture for most standing sequences. Parvatasana, by contrast, is seated, built from Padmasana or a comfortable cross-legged base, with the defining action being the arms raised overhead and palms joined. If your teacher says “Mountain Pose” mid-class, the context — standing or seated — usually makes clear which one they mean, but it’s a good habit to ask if you’re ever unsure.
How Does Parvatasana Fit Into a Yoga Practice?
Parvatasana is commonly used in three ways. First, as a warm-up, it opens the shoulders and spine gently before deeper backbends or twists. Second, as a counterpose, it’s often placed after forward folds or twisting postures to restore length through the sides of the body. Third, in pranayama-focused sessions, it’s held for longer breath cycles as a way to combine gentle stretch with breath awareness, similar to how some styles integrate stretching directly into breathing practice, as covered in guides on pranayama breathing techniques. In a typical class flow, you might see Parvatasana appear after a round of Surya Namaskar (Sun Salutations), once the body is already warm and the shoulders are ready to stretch further overhead.
Who Should Avoid Parvatasana?
Parvatasana is a low-intensity pose, but it isn’t right for everyone. Exercise caution or skip the pose if you have:
- Shoulder injuries: raising the arms fully overhead can aggravate a rotator cuff issue or recent shoulder strain.
- High blood pressure: some teachers advise caution with sustained overhead arm positions if your blood pressure isn’t well controlled; check with a doctor first.
- Knee or hip injuries: since the base is usually Padmasana, anyone with knee pain, hip impingement, or recent lower-body surgery should use Sukhasana or sit on a chair instead, keeping only the arm and spine action.
- Spinal conditions: if you have a diagnosed spinal condition or recent back injury, get individualized guidance before adding the extended arm-reach variations, particularly the backward bend.
As with any asana, these are general precautions rather than a substitute for advice from a qualified teacher or physician who knows your specific history.
What Mistakes Do Beginners Make in Parvatasana?
A few habits quietly undercut the pose’s benefits. Watch for these:
Hunching the shoulders toward the ears. The instinct when reaching overhead is often to shrug, which shortens the neck and defeats the point of the stretch. Keep drawing the shoulder blades down the back even as the arms lift.
Locking the elbows. Fully locking the elbow joints puts unnecessary strain on the joint capsule. Keep a soft, straight line through the arms without hyperextending.
Forcing Lotus Pose. If your hips and knees aren’t ready for full Padmasana, forcing the position to “look right” is a common way people injure the knees. Use Sukhasana or Ardha Padmasana instead — the arm-raising action is unaffected by which seated base you choose.
Holding the breath. Some beginners tense up and stop breathing once the arms are raised. Keep a slow, even breath throughout the hold; the calming effect of the pose depends on it.
How Does Parvatasana Compare to Similar Poses?
It helps to see Parvatasana next to related postures so you understand where it fits in a broader practice. Compared to Vrksasana (Tree Pose), which challenges standing balance on one leg, Parvatasana is a seated, stable posture that focuses entirely on the upper body and spine. Compared to Tadasana, discussed above, the difference is standing versus seated. And compared to a full backbend, Parvatasana’s backward-lean variation is far gentler, making it a reasonable entry point before attempting deeper backbends elsewhere in a sequence. If you’re building a well-rounded seated and standing repertoire, it’s worth exploring the wider library of types of yoga and how different styles sequence poses like this one.
Can Parvatasana Help With Stress and Breathing?
Because Parvatasana is usually held with slow, deliberate breathing, it’s often used as a settling posture rather than a purely physical stretch. The overhead arm position opens the front of the chest, which can make each breath feel a little fuller and less restricted, particularly for people who habitually breathe shallowly. This pairs well with broader stress-management practice; many students combine it with the kind of intentional breathwork covered in resources on yoga for stress relief, using the pose as a physical anchor for a calmer nervous system state.
How Often Should You Practice Parvatasana?
Because it’s a low-impact pose, Parvatasana can be practiced daily without the recovery concerns that come with more demanding postures. Two to four rounds of 15 to 30 seconds each is a reasonable daily dose for most people. If you’re using it as a warm-up before a fuller session, one or two rounds is usually enough; if you’re using it as a standalone shoulder-and-spine reset during a busy day, a few slow rounds with extended holds can be more effective than rushing through several quick ones.
Questions People Ask About Parvatasana
Is Parvatasana a beginner pose?
Yes, the arm and spine action in Parvatasana is beginner-friendly. The main challenge for newer practitioners is usually the base position, Padmasana (Lotus Pose), which requires hip flexibility that takes time to develop. Beginners can get the same shoulder and spine benefits by practicing from Sukhasana (Easy Pose) instead of forcing full Lotus.
What’s the difference between Parvatasana and Tadasana?
Parvatasana is seated, built from Padmasana or a cross-legged base with the arms raised overhead and palms joined. Tadasana is a standing pose used as the foundational alignment posture for standing sequences. Both are sometimes translated as “Mountain Pose,” but they are structurally different postures used in different parts of a practice.
How long should you hold Parvatasana?
Most guidance suggests holding the pose for 15 to 30 seconds per round, repeated for two to four rounds with steady breathing. Longer holds of up to a minute are fine once the shoulders and lower body feel comfortable, but there’s no strict rule; comfort and breath quality should guide the duration more than a fixed timer.
Can I do Parvatasana without Lotus Pose?
Yes. If Padmasana is uncomfortable or inaccessible, practice the same overhead arm and spine action from Sukhasana (Easy Pose), Ardha Padmasana (Half Lotus), or even seated in a chair. The shoulder, spine, and breathing benefits come primarily from the arm and torso action, not from the specific leg position.
Does Parvatasana help with posture?
Regular practice is commonly reported to support better posture by stretching the shoulders and chest while training the muscles that keep the spine lifted. Since it directly counters the forward-rounding pattern common from desk work and phone use, many people find it useful as a short daily reset, though it works best alongside broader postural habits rather than as a standalone fix.
Try This for Yourself
Reading about Parvatasana only gets you part of the way there — the real value comes from feeling the stretch through your own shoulders and spine, with someone watching your alignment. If you’d like personalized guidance on this pose and how it fits into a session built around your body and goals, join a class with FitStrot’s online yoga classes and practice it live with an instructor.
Related reading: Yoga Poses, Surya Namaskar, Tadasana, Vrksasana, and Online Yoga Classes.